Using Computer Vision to Orchestrate Industrial Assets
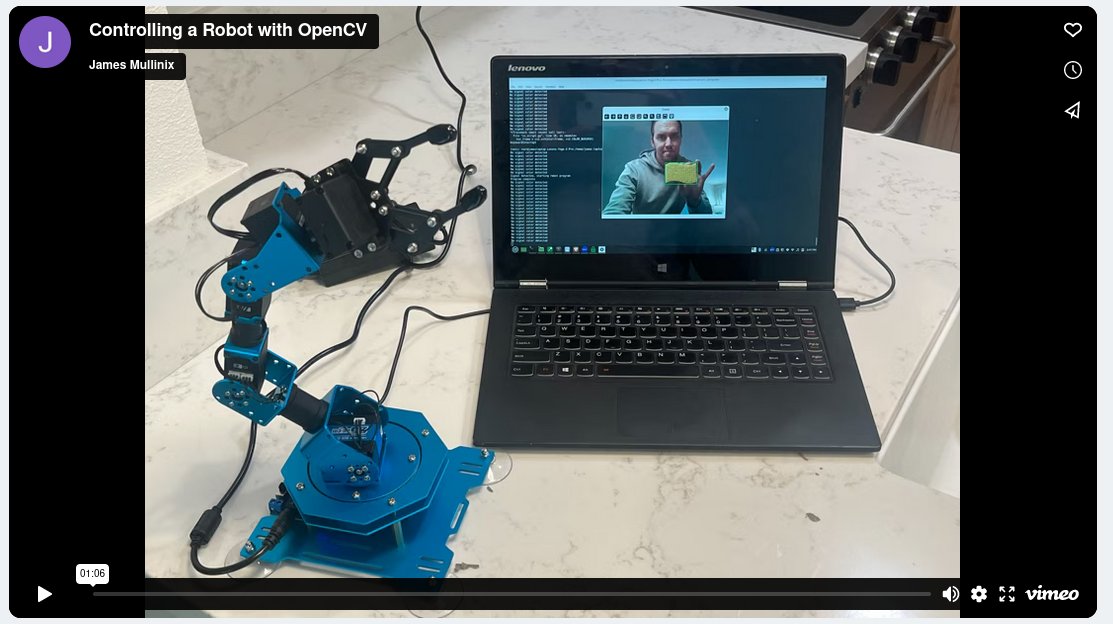
April 8, 2024 This Christmas my wife begrudgingly purchased me a robot so that I could have (yet another) piece of technology to play with during my weekend technology hobbying sessions. She's ready for me to ship out some of the gadgetry I've accumulated over time, but I have a hard time letting go. Anyways, I recently got some time to put this thing together. This is the robotic arm, the Hiwonder xArm 1S, pictured to the left there. Obviously this isn't a production grade robot and the servos kind of sound like a really big mosquito buzzing in your ear, but for my purposes it's fun.
Now, the purpose of this post is to offer a tutorial on how one might use visual queues like a color to control a robot. There are tons of industrial use cases where complex operations or interactions between people and machines could be abstracted by visually triggering an automated action defined in code. I will show some very simple/arbitrary programs, but you could create quite a sophisticated system with this sort of thing. Also I'm not going to show you how to build the actual robot if you do choose to buy one and follow along, but there is a video series that kicks off here and is useful for that: xArm1S Assembly 1.
For this project we're going to be using python, OpenCV, along with the library xarm. There are a few other dependencies we'll install but those 2 will facilitate what we're trying to do. I'm also doing this on a linux machine, if you'd like to follow along on windows I recommend using Git Bash. See the video above for a demo, and find the code for this project here:
First we'll create a virtual environment for our project and activate it
In your bash terminal:
This Christmas my wife begrudgingly purchased me a robot so that I could have (yet another) piece of technology to play with during my weekend technology hobbying sessions. She's ready for me to ship out some of the gadgetry I've accumulated over time, but I have a hard time letting go. Anyways, I recently got some time to put this thing together. This is the robotic arm, the Hiwonder xArm 1S, pictured to the left there. Obviously this isn't a production grade robot and the servos kind of sound like a really big mosquito buzzing in your ear, but for my purposes it's fun.
Now, the purpose of this post is to offer a tutorial on how one might use visual queues like a color to control a robot. There are tons of industrial use cases where complex operations or interactions between people and machines could be abstracted by visually triggering an automated action defined in code. I will show some very simple/arbitrary programs, but you could create quite a sophisticated system with this sort of thing. Also I'm not going to show you how to build the actual robot if you do choose to buy one and follow along, but there is a video series that kicks off here and is useful for that: xArm1S Assembly 1.
For this project we're going to be using python, OpenCV, along with the library xarm. There are a few other dependencies we'll install but those 2 will facilitate what we're trying to do. I'm also doing this on a linux machine, if you'd like to follow along on windows I recommend using Git Bash. See the video above for a demo, and find the code for this project here:
First we'll create a virtual environment for our project and activate it
In your bash terminal:
# Change directories to the desktop
cd ~/Desktop

# Create a new directory here for our project
mkdir xarm_programs

# Move into the new directoy
cd xarm_programs

# Create the python virtual environment
python3 -m venv venv
Generally it's best practice to use virtual environments to separate out your project dependencies from system python. Let's activate the environment and get started:
# Move into the venv directory
cd venv

# Move to bin
cd bin

# If you ls here you'll see that there is a binary file called activate
# Run source activate to configure your session to use venv python and pip
source activate
Now let's install all the relevant packages to make the project work
# pip command to install project packages
pip3 install Cython hidapi numpy opencv-python xarm
Now that the environment is set up, let's take look at two python files. The first one has the code that the robot will execute when it gets signalled to by the computer vision algorithm. We'll call it xarm_cmds.py:
import xarm


arm = xarm.Controller('USB')


def set_default_positions():

    for servo in list(range(1,7)):
        arm.setPosition(servo, 0.0, 1000, True)

def test_range_of_motion():

    for servo in list(range(1,7)):
        arm.setPosition(servo, -60.0, 2000, True)
        arm.setPosition(servo, 60.0, 2000, True)
        arm.setPosition(servo, 0.0, 2000, True)

def yellow_trigger():

    for servo in list(range(1,7)):
        arm.setPosition(servo, -70.0, 1000, True)
        arm.setPosition(servo, 70.0, 1000, True)
        arm.setPosition(servo, 0.0, 1000, True)

def pink_trigger():

    arm.setPosition(6, 30.0, 1000, True)
    arm.setPosition(5, 40.0, 500, True)
    arm.setPosition(4, 50.0, 500, True)
    arm.setPosition(3, -60.0, 500, True) # think i accidentally reversed this servo on setup
    arm.setPosition(2, 30.0, 500, True)
    set_default_positions()
There are 6 servos as mentioned before, this code essentially defines a few sequences of movements the robot will do. The setPosition method takes a servo id, an angle, milliseconds for the movement, and True confirms a 1 second default wait time. The functions we will call in the computer vision loop are the pink and yellow triggers.
The main driver for this project is the file cv_loop.py, have a look below.
This code continuously loops through frames streamed by the webcam and checks each frame for an instance of the color defined in the detect_color function. We're going to use pink and yellow because those colors work well against the ceiling which I used as the background in my project. Note that lighting and other sources of color in the frame can trigger the actions so you do want to control the sensitivity of the color ranges as well as what is in view of whatever camera you would want to use. If pink or yellow is detected in frame this script will run xarm_cmds.pink_trigger() or xarm_cmds.yellow_trigger() respectively. A brief timeout is also set to buffer program runs.
import cv2
import numpy as np
from datetime import datetime, timedelta
import xarm_cmds

# Get the webcam and a timestamp
# We'll use the timestamp in a timeout later
vid = cv2.VideoCapture(0)
run_time = datetime.now()

def detect_color(hsv_frame):

    """
    This function takes an hsv video frame, checks if certain colors
    are in the frame and returns a bounding box along with the string
    indicating which color was detected. If no color is detected it returns
    None and (0,0,0,0). It only returns the first color it finds.
    """


    # {'color':[[lower_hsv_bound],[upper_hsv_bound]]}

    color_dict = {
    'yellow': [[20, 100, 100],[40, 255, 255]],
    #'blue' : [[110, 100, 100], [130, 255, 255]],
    'pink': [[155, 100, 100],[175, 255, 255]]
     }

     # loop through the colors and see if theres a hit
     # otherwise return (0,0,0,0)

    for color, bounds in color_dict.items():

        lower_bound = np.array(bounds[0])
        upper_bound = np.array(bounds[1])

        mask = cv2.inRange(hsv_frame, lower_bound, upper_bound)
        bbox = cv2.boundingRect(mask)

        if bbox != (0,0,0,0):

            return color, bbox

    return None,(0,0,0,0)


# This while loop handles the video stream
# You can hit CTRL C to break out of it
while True:

    # Return the frame captured by the webcam
    # We're going to use HSV instead of RGB
    # HSV does better for object detection
    # https://www.opencv-srf.com/2010/09/object-detection-using-color-seperation.html

    ret, frame = vid.read()
    hsv_frame = cv2.cvtColor(frame, cv2.COLOR_BGR2HSV)

    if ret:

        color, bbox = detect_color(hsv_frame)

        # if we get a bounding box, use it to draw a rectangle on the image
        if bbox != (0,0,0,0):

            x, y, w, h = bbox
            cv2.rectangle(frame, (x, y), (x + w, y + h), (0, 255, 0), 2)

            if datetime.now() > run_time:

                    print(f'{color} signal detected, starting robot program')

                    if color == 'yellow':
                        xarm_cmds.yellow_trigger()

                    if color == 'pink':
                        xarm_cmds.pink_trigger()

                    run_time = run_time + timedelta(minutes = 0.75)
                    print('Program complete')

        else:
            print('No signal color detected')

        cv2.imshow('frame', frame)
        cv2.waitKey(1)
Finally to run this code do the following in your bash terminal:
python3 cv_loop.py

# This will start the computer vision loop, press ctrl+c to break out of it to stop
# If you get a hid error, reactivate the venv as the super user
# To do this follow these steps:
source deactivate
sudo su
cd ~/Desktop/xarm_programs/venv/bin
source activate
cd ~/Desktop/xarm_programs/
python3 cv_loop.py
And that's really it. A simple project overall, but hopefully revealing in terms of adding another tool to the toolbox of industrial automation.